
Absolute Error in Measurement
What is Absolute Error?
The absolute error \( e_x \) captures the uncertainty or possible deviation of a measurement from an average value \( \bar{x} \) or a set of measurements. $$ x = \bar{x} \pm e_x $$
This provides a way to express how much a measurement could differ from the true value due to unavoidable variations in the process.
How is Absolute Error Calculated?
To estimate the uncertainty in a measurement based on a series of observed values, one of the simplest and most effective approaches is to calculate absolute error using the half-range.
The half-range estimates the absolute error by dividing the difference between the maximum and minimum observed values by two:
$$ e_{x} = \frac{x_{\text{max}} - x_{\text{min}}}{2} $$
In this calculation:
- \( x_{\text{max}} \) is the highest recorded value;
- \( x_{\text{min}} \) is the lowest recorded value;
- \( e_{x} \) represents the absolute error for the measured quantity \( x \).
This method is based on the idea that the spread of the data reflects measurement uncertainty: the more spread out the values, the greater the associated uncertainty.
Why is Half-Range a Good Estimate of Error? The reasoning behind half-range is straightforward and intuitive: greater variability in measured values points to higher uncertainty. If the data points are closely clustered around a certain value, the half-range will be small, indicating lower error. On the other hand, if values are widely dispersed, the half-range will be larger, signaling greater uncertainty.
The absolute error also depends on the sensitivity of the measuring instrument (\( e_s \)), or the smallest detectable change. This sensitivity sets the minimum limit for the precision of the measurement.
- If \( e_x > e_s \): When the absolute error \( e_x \), estimated via half-range, is greater than the instrument's sensitivity \( e_s \), using the half-range as the error estimate is preferable, as it better captures the actual variability in the data.
- If \( e_x \le e_s \): If the absolute error \( e_x \) is less than or equal to the sensitivity \( e_s \), it is more accurate to adopt the sensitivity as the absolute error, as the observed variations are smaller than the instrument’s precision and therefore less reliable.
Practical Example
Imagine measuring a physical quantity \( x \) with an instrument that has a sensitivity of 0.1 cm.
You obtained the following values from five measurements:
$$ 2.4 \ \text{cm} , \ 2.5 \ \text{cm} , \ 2.7 \ \text{cm} , \ 2.6 \ \text{cm} , \ 2.4 \ \text{cm} $$
Calculate the average value:
$$ \bar{x} = \frac{2.4 + 2.5 + 2.7 + 2.6 + 2.4}{5} = 2.52 \ \text{cm} $$
However, the average value alone doesn’t give you the measurement’s uncertainty. To estimate this, calculate the absolute error.
Identify the maximum value and the minimum value in the data.
- Maximum value \( x_{\text{max}} = 2.7 \)
- Minimum value \( x_{\text{min}} = 2.4 \)
Then calculate the half-range:
$$ e_x = \frac{2.7 - 2.4}{2} = 0.15 \ \text{cm} $$
Now compare this calculated absolute error with the sensitivity of the measuring instrument.
Since the half-range \( e_x = 0.15 \) is greater than the instrument’s sensitivity (0.1), the best estimate for the absolute error is 0.15.
$$ x = \bar{x} \pm e_x $$
$$ x = 2.52 \pm 0.15 \ \text{cm} $$
This means that the measured value lies between 2.52 - 0.15 cm and 2.52 + 0.15 cm.
$$ 2.37 \ \text{cm} < x < 2.67 \ \text{cm} $$
Example 2
Consider the same set of measurements, but this time with an instrument that has a sensitivity of 0.5 cm. In other words, the scale markings are 0.5 cm apart instead of 0.1 cm.
You recorded the same values:
$$ 2.4 \ \text{cm} , \ 2.5 \ \text{cm} , \ 2.7 \ \text{cm} , \ 2.6 \ \text{cm} , \ 2.4 \ \text{cm} $$
The average value remains the same:
$$ \bar{x} = \frac{2.4 + 2.5 + 2.7 + 2.6 + 2.4}{5} = 2.52 \ \text{cm} $$
The absolute error based on half-range is also the same:
$$ e_x = \frac{2.7 - 2.4}{2} = 0.15 \ \text{cm} $$
However, in this case, the half-range (0.15 cm) is less than the instrument’s sensitivity (0.5 cm).
Since the absolute error estimated by half-range (0.15 cm) is less than the instrument’s sensitivity (0.5 cm), you should use the instrument’s sensitivity as the absolute error.
$$ x = 2.52 \pm 0.5 \ \text{cm} $$
This is because the sensitivity indicates the minimum precision limit of the instrument, and any variation smaller than 0.5 cm cannot be reliably measured with this instrument.
Thus, the measured value lies between 2.52 - 0.5 cm and 2.52 + 0.5 cm.
$$ 2.02 \ \text{cm} < x < 3.02 \ \text{cm} $$
In other words, the absolute error for this set of measurements is 0.5 cm, reflecting the instrument’s sensitivity, as the data variations fall below the accuracy provided by this instrument.
When is it best to avoid using semi-dispersion?
When you’re taking multiple measurements, semi-dispersion can be distorted by occasional outliers or extreme values, measurements that are unusually high or low due to random errors or chance.
This can result in an unreliable estimate of the true spread of data.
For example, suppose we measure the temperature in a room and get the following readings in degrees Celsius: $$
20.1, \quad 20.3, \quad 20.2, \quad 20.4, \quad 20.2, \quad 25.0 $$ In this case, 25.0 is a clear outlier compared to the others, likely due to a measurement error or a temporary fluctuation that doesn’t reflect the overall trend. If we calculate the maximum semi-dispersion using these values, the result will be heavily influenced by the extremes \(20.1\) and \(25.0\), potentially overstating the actual spread. $$ e_x = \frac{25.0 - 20.1}{2} = 2.45 $$ Thus, considering the average of these values is $ \bar{x} = 21.0 \ \text{cm} $, the absolute error becomes too large $$ x = 21.0 \pm 2.45 \ \text{cm} $$
In such cases, it’s better to use standard deviation to measure the spread of values around the mean, providing a more reliable gauge of data variability.
Standard deviation is a better metric because it takes all values into account, not just the extreme points.
As a result, it offers a more representative measure of how values are dispersed around the mean and provides a more accurate reflection of data uncertainty.
For example, if we calculate the standard deviation for the data in the previous example, we’ll get a value that considers all the readings. This way, it’s less impacted by the outlier (25.0°), yielding a more accurate reflection of the true spread around the average of typical values ($ \bar{x} = 21.0°C $). $$ \sigma = \sqrt{\frac{1}{n} \sum_{i=1}^{n} (x_i - \overline{x})^2} $$ $$ \sigma = \sqrt{\frac{1}{6} \cdot [(20.1-21)^2+(20.3-21)^2+ ... + (25-21)^2 ]} $$ $$ \sigma = \sqrt{\frac{1}{6} \cdot 19.99} $$ $$ \sigma = \sqrt{3.33} $$ $$ \sigma = 1.82 \ \text{cm} $$ So, the standard deviation is approximately 1.82 cm. $$ x = 21.0 \pm 1.82 \ \text{cm} $$ In this case, the absolute error (1.82 cm) is smaller than the one calculated with semi-dispersion (2.45 cm).
Significant Figures in Absolute Error
Absolute error should always be rounded to one or two significant figures to avoid suggesting excessive precision where, ultimately, there is an error.
The aim is to prevent any misleading impression of accuracy that isn’t genuinely present.
Moreover, the last significant figure of the reliable (measured) value should match the decimal place of the error, ensuring consistency in decimal places.
For example, if your error is 0.02 cm, the measurement’s precision stops at the hundredths place. Consequently, the measured value should also be rounded to the hundredths place to accurately reflect the level of uncertainty.
Example
Imagine you're measuring the length of an object with a precise ruler and record the following values:
- Measured value: \( 12.346 \) cm
- Absolute error: \( 0.05 \) cm
The error of \( 0.05 \) cm has its last significant figure in the hundredths place.
To follow the rule of decimal consistency, round the measured value to match the decimal place of the error, which is to the hundredths.
This means \( 12.346 \) cm rounds to \( 12.35 \) cm.
In the end, you can present the result in a clear, consistent format, combining value and error as follows:
$$ \text{Length} = (12.35 \pm 0.05) \, \text{cm} $$
By aligning the measured value’s precision with the error’s decimal place, you ensure the result reflects the true precision of the measurement, without implying an unrealistic level of accuracy.
How to Visualize Absolute Measurement Errors on a Graph
Absolute errors are illustrated using segments perpendicular to the axes, starting from the measured data points:
- Horizontal segments represent the uncertainty in the x-axis measurement (\(x\)).
- Vertical segments represent the uncertainty in the y-axis measurement (\(y\)).
The length of each segment corresponds to the range of the absolute error, calculated as the difference between the maximum and minimum possible values, including the error.
For example, if a measurement \(x\) has an absolute error of \( \pm 0.2 \), the horizontal segment along the x-axis will extend from \(x - 0.2\) to \(x + 0.2\).
These segments provide a clear visualization of how measured values might vary due to errors.
A Practical Example
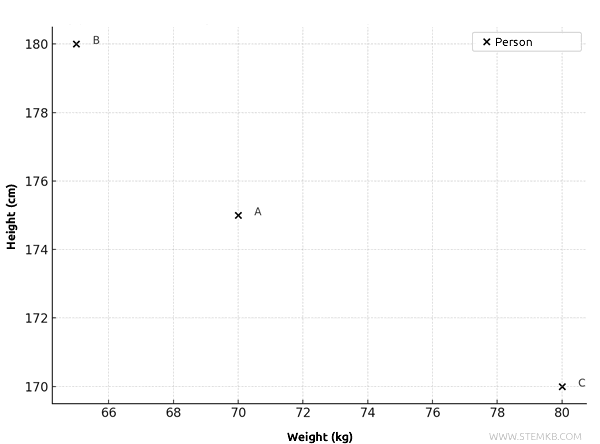
Imagine measuring the height (\(y\)) and weight (\(x\)) of three individuals, each with specific absolute errors. Here’s the data:
| Person | Weight (x) [kg] | Absolute Error (±) | Height (y) [cm] | Absolute Error (±) |
|---|---|---|---|---|
| A | 70 | 2 | 175 | 3 |
| B | 65 | 1.5 | 180 | 2 |
| C | 80 | 3 | 170 | 4 |
The reliable data points on the graph are as follows:
- Person A: \( (70, 175) \)
- Person B: \( (65, 180) \)
- Person C: \( (80, 170) \)
However, these points alone don’t reflect the absolute errors in the measurements.
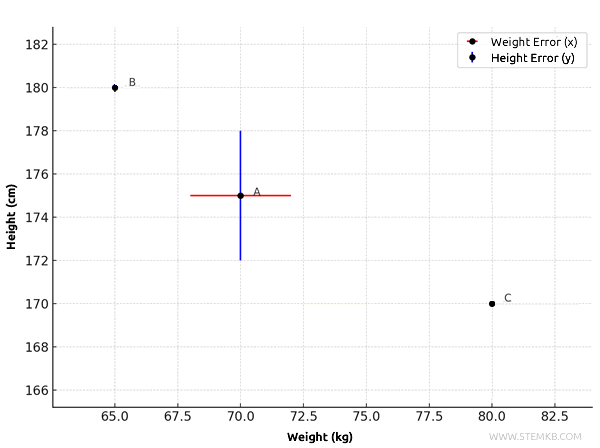
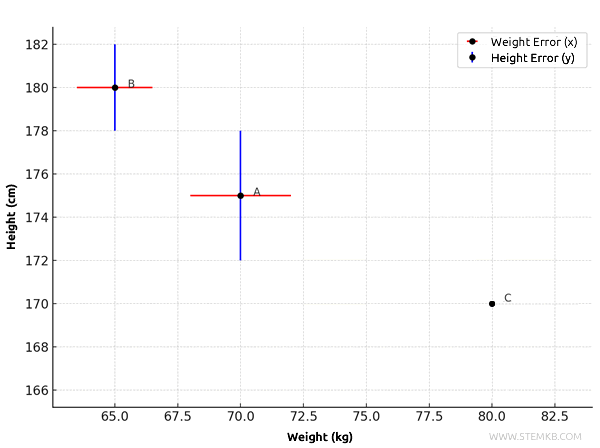
To incorporate the absolute errors, we add perpendicular segments to each point on the graph to show the error ranges:
- Person A (\(x = 70\), \(y = 175\)):
- Weight (\(x\)): absolute error of \( \pm 2 \), so the horizontal segment spans from \( 70 - 2 = 68 \) to \( 70 + 2 = 72 \).
- Height (\(y\)): absolute error of \( \pm 3 \), so the vertical segment spans from \( 175 - 3 = 172 \) to \( 175 + 3 = 178 \).
- Person B (\(x = 65\), \(y = 180\)):
- Weight (\(x\)): absolute error of \( \pm 1.5 \), so the horizontal segment spans from \( 65 - 1.5 = 63.5 \) to \( 65 + 1.5 = 66.5 \).
- Height (\(y\)): absolute error of \( \pm 2 \), so the vertical segment spans from \( 180 - 2 = 178 \) to \( 180 + 2 = 182 \).
- Person C (\(x = 80\), \(y = 170\)):
- Weight (\(x\)): absolute error of \( \pm 3 \), so the horizontal segment spans from \( 80 - 3 = 77 \) to \( 80 + 3 = 83 \).
- Height (\(y\)): absolute error of \( \pm 4 \), so the vertical segment spans from \( 170 - 4 = 166 \) to \( 170 + 4 = 174 \).

Now, the graph representing the height and weight data for these three individuals also includes the absolute errors.
The horizontal segments (weight) and vertical segments (height) at each point are proportional to the absolute errors, illustrating the uncertainties in the measurements.
This approach makes it easy to visualize the possible variations caused by measurement errors.
Graphical representation of absolute errors is extremely useful for visualizing the uncertainty associated with a measurement and quickly assessing the precision of the data at a glance.